Map-Making: A Guide

Created With Photoshop by Christopher D Eldridge & Robert Altbauer
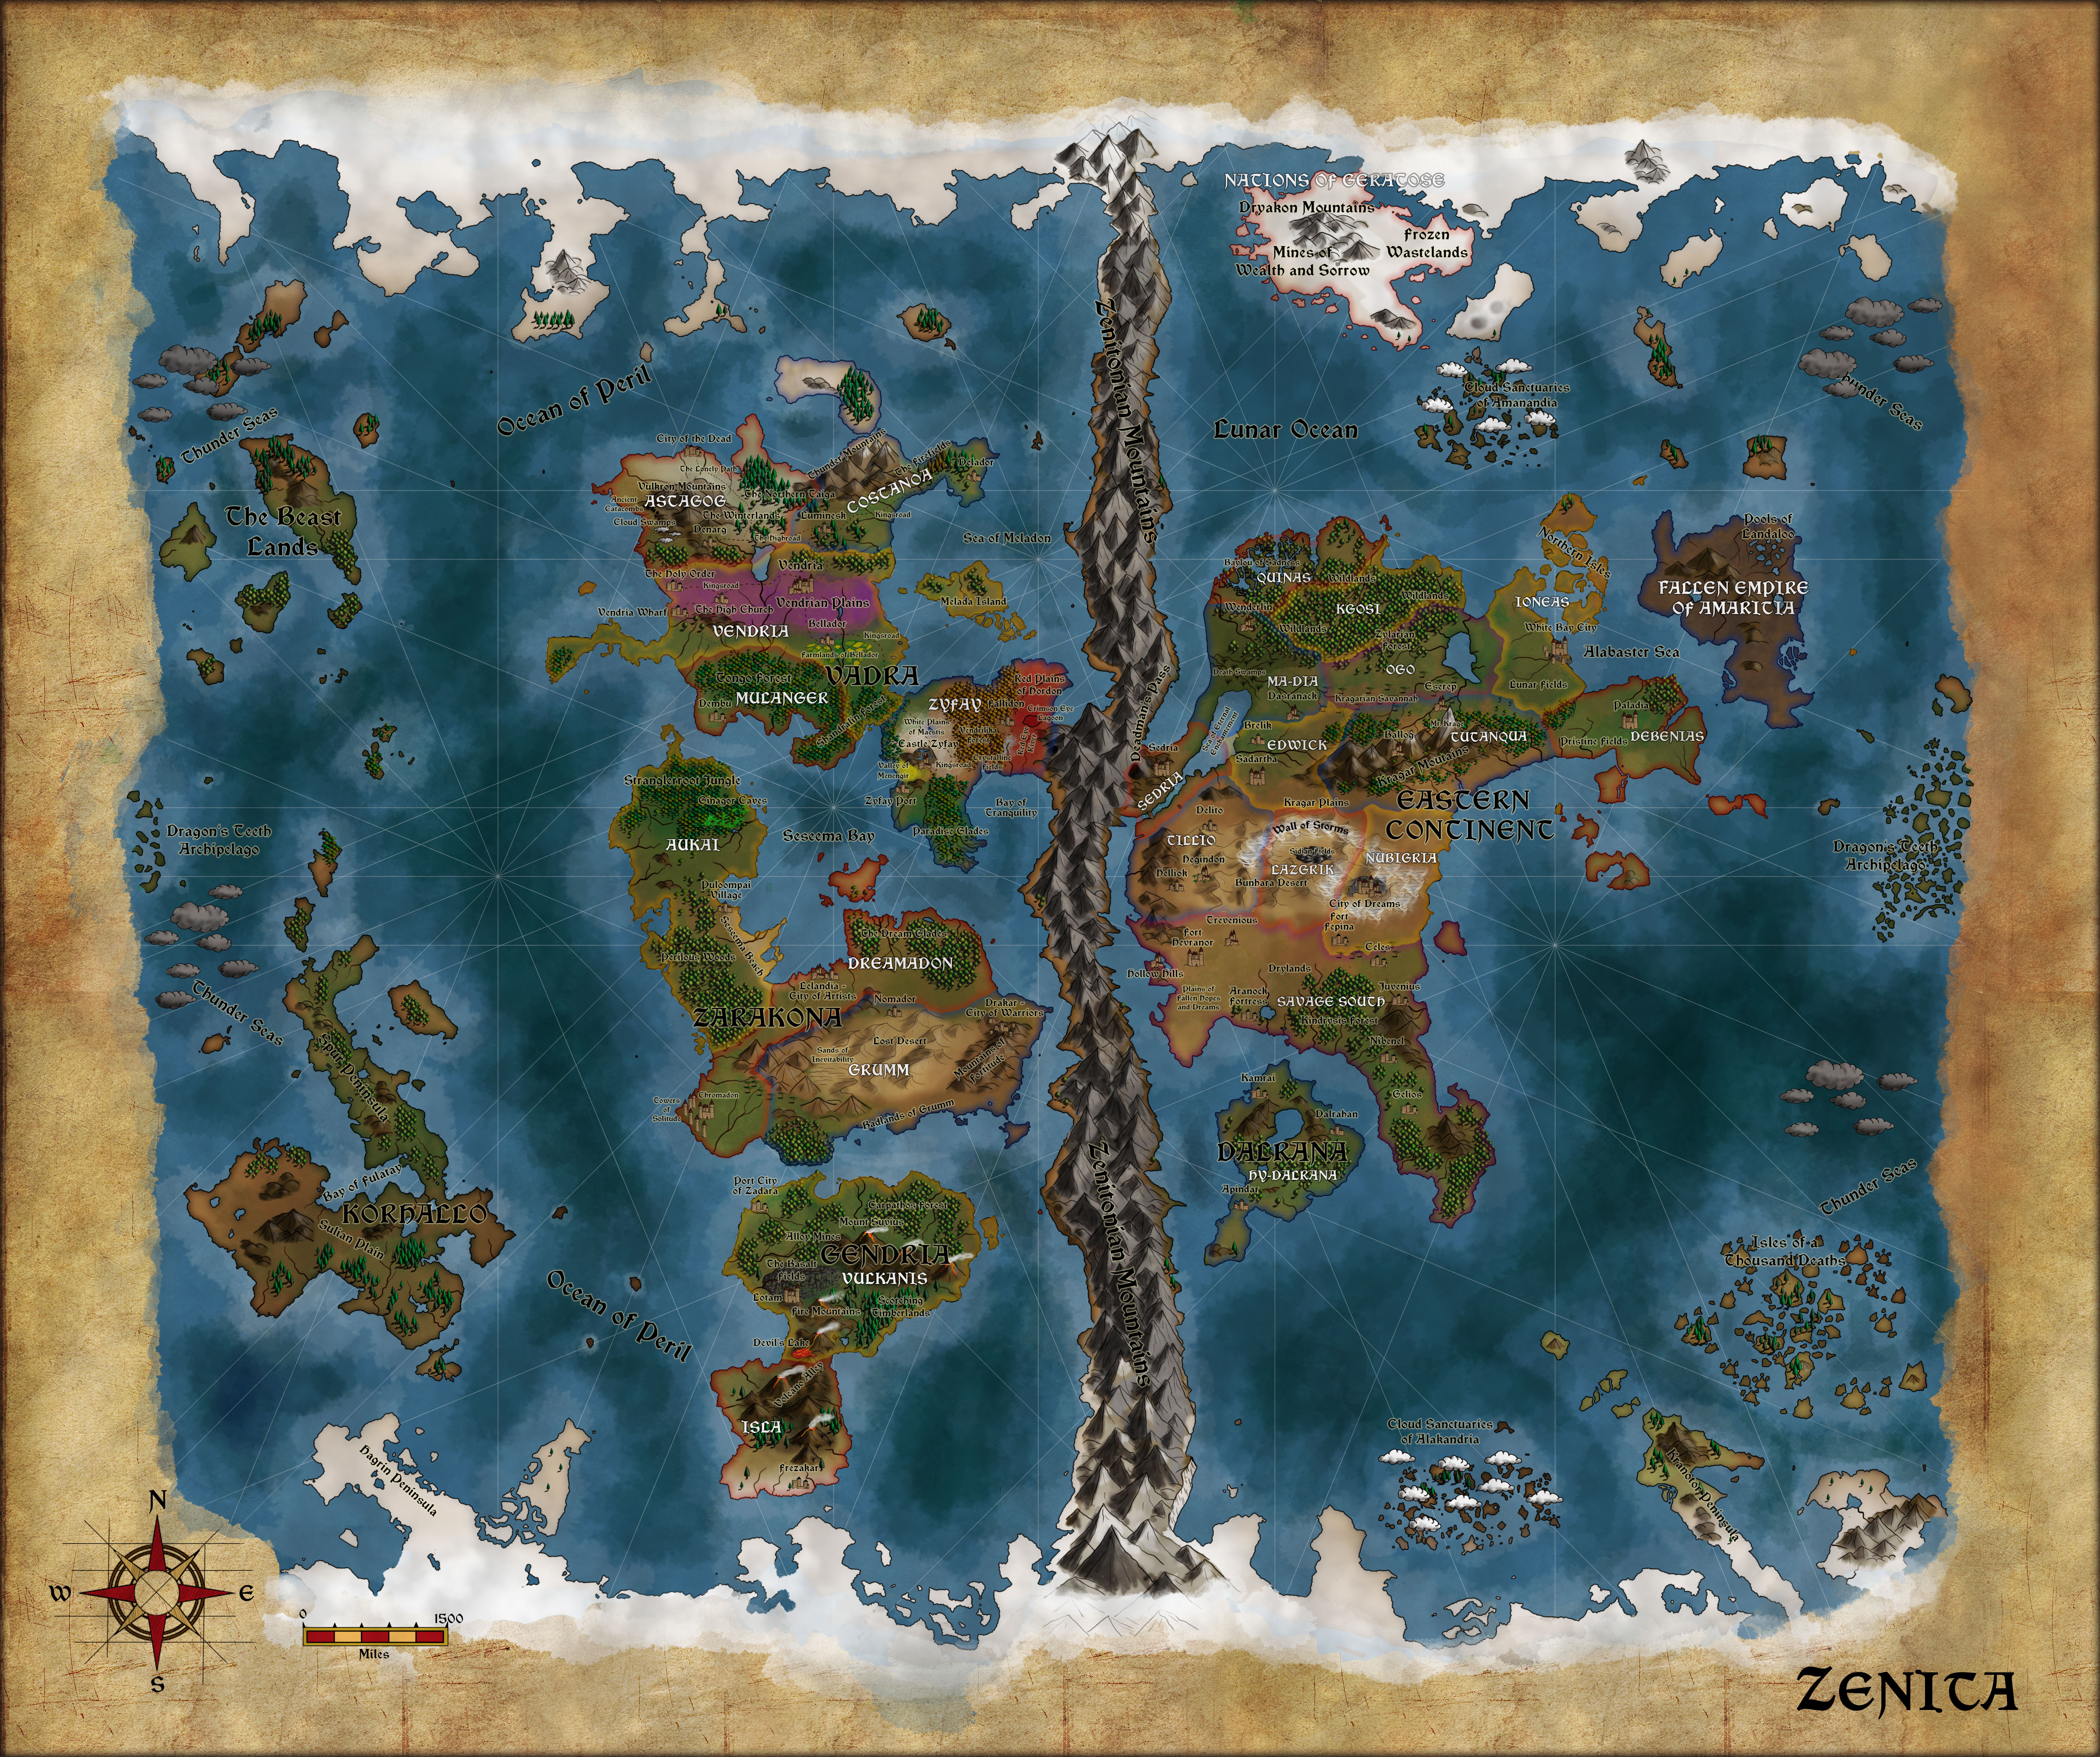
Map of My World – CLICK TO ENLARGE IMAGE
I. Why Create A Map?
Until you put your world on paper or on file, it is no more than a figment of your imagination, no matter how well-realized that figment may be. Creating a map of your world is one of the first steps you should take in world-building. In fact, I believe it is a must. Not only then does your world become tangible, and perhaps something you can show off to others, but it also becomes part of a chain reaction in which your map and story feed off of one another.
So start creating your map as soon as you start writing your novel. Because even if you haven’t started world-building for your stories, or for that matter writing them, making a map will work wonders for creating your world and the setting for your stories to take place in. It’ll force you to think about what you want in your world and where everything should go. You’ll be able to solve any problems with where your cities, biomes, and natural features (like lakes and rivers) are all located in relation to each other. In addition, you’ll be able to accurately judge travel times in your story because you’ll have the distances right in front of you on your map. Not to mention places for your protagonist to go to or exotic places to speak of. Your story will blossom, it will feel real, and it will be accurate.
II. Where To Begin? How Do I Create A Map?
A great place to find information on how to build a world and create maps is the Cartographer’s Guild. This is an invaluable website for map-making enthusiasts and world-builders. Here you’ll find people ranging from the occasional dabbling hobbyist to the hardcore professional designing games, movies or simply making maps for a living. There are tutorials here that cover a vast range of topics, and if you can’t find an answer to a question, just ask, and someone will likely be able to answer it for you. Furthermore, if you have a world visualized, but can’t create it yourself, this is a place where you can find someone to do it for you. Maybe even for free.
Eventually I realized that I could never hand-draw a respectable map as my artistic prowess was that of a child. So I went in search of a program that could do it for me. What I found were several different software programs specifically made to create fantasy/sci-fi maps. These include, but are not limited to: Dundjinni, Fractal Mapper, Fractal Terrains (FT Pro), and Campaign Cartographer 3(CC3). There are free programs out there as well, but most are limited in what you can do with them.
Personally, I’ve only used Fractal Terrains and CC3, both of which can work in tandem. And let me tell you they are incredible software. If you want to make maps and build worlds, I’d highly recommend them. For the price, you can’t go wrong. FT Pro is much more advanced and is meant to create the actual world itself. You can create an entire planet with world data like altitude, climate, temperature and even annual rainfall. Then you can import that world into CC3 and build upon it. I, however, only used CC3 since FT Pro creates a photorealistic world and is extremely advanced.
CC3 was more than enough. It had all the symbols I needed: towns, cities, castles, and towers, all of various types and sizes; dozens of different kinds of vegetation; many styles of natural features like craters, mesas, and mountains; and all the necessary tools to draw landmasses, roads, oceans, seas, lakes and rivers. It was exactly what I needed–no artistic ability necessary. I spent the next two months, day and night, building my world, and eventually my map took shape.
There are of course programs like corelDRAW, Adobe Photoshop/Illustrator, and GIMP (free), but these are not only more expensive, they require you to do the drawing yourself. Sure you can scrounge around and find some symbols to import in, but you’ll be in for a lot more work. With that being said, if you have the talent and/or the time to learn to use these paint/drawing programs, then you can create some incredible maps. My newest map was created in Photoshop from my CC3 prototype.
III. Let’s Start Building
I’ll take you step-by-step and give you examples by showing you how I created my world in Photoshop.
Note: This is not a step-by-step tutorial on how to use or illustrate with Photoshop (though I will show you how to create parts of a map in Photoshop). There are countless tutorials online how to use Adobe Photoshop or Illustrator. Instead, this is a guide to help you create a realistic and fully-realized world. You can accomplish this by drawing it by hand with pencil or ink or with any number of the computer programs mentioned earlier in this article. In fact, below is the map I created using Campaign Cartographer 3 using the principles outlined in this guide. My Illustrator Robert Altbauer then took the map I created and illustrated it in Photoshop. I have since continued to update the map myself.

A. Create Your Landmasses and Oceans
If using a program that uses layers (such as Photoshop), start by creating your ocean on one layer and then all your landmasses (including islands and the poles) on a second layer.
CLICK TO ENLARGE IMAGES


On the above map/s there are two layers; the ocean (in blue); and the landmasses in tan. This is a very basic beginning of a world map. Later, we’ll rough up the edges of the continents and refine the landmasses and islands (even add some). On this starter map there are four major continents, six islands (two of the islands are actually the same island chain which wraps around the map-remember a world is a spherical globe), and a mountain range that runs between the north and south pole. Create as many landmasses as you desire. Maybe you want a world full of nothing but island chains, or maybe just one super continent. It’s your world, so you have free creative reign.
B. Create Your Biomes/Ecosystems
The next step is to create the various biomes that will make up your world. Here is a simplified list of Earth’s biomes:

Distribution of Earth’s Biomes
1. Tundra – Polar desert, no trees, only top four inches of soil thaws in summer; winter average temps around -20 °F, summer temps rise as high as 50°F.

Tundra Distribution
2. Taiga (Boreal Forest) – Coniferous forests found throughout the high northern latitudes, between tundra and temperate forest. Short summers, long winters.
World’s largest land biome.
3. Temperate Deciduous Forest – Well defined seasons of warm and cold; varying ranges of rainfall; fertile soils, many different tree species, understory shrubs and herbaceous plants.
4. Tropical Rainforest – Near Equator, high rainfall and humidity; soils devoid of nutrients; lush, layered canopy with high diversity of life.

Forest Distribution
5. Grasslands (Prairies, Savanna, Steppe) – Interior of continents and within rain shadows; hot summers, cold winters; frequent droughts and fires. Mostly grasses, some woody plants, little trees; supports large numbers of herbivores.

Grassland Distribution
6. Desert – Within a belt along the equator, stretching from 30°S to 30°N in latitude and in rain shadows of mountains. Very little and unpredictable precipitation. Warm deserts–mild winters; cold deserts–long winters with temperatures well below freezing. Nutrient -poor soils, sparse plant cover; rich in reptiles and rodents, most animals are nocturnal.

Desert Distribution

Earth’s Biomes by Percentage
Forests – 38% + Grasslands – 23% = 61% of Earth’s Terrestrial Biomes
As you can see nearly two-thirds of earth’s biomes are covered by either forests or grasslands. In addition, grasslands, savannas and woodlands are part of a continuum that are divided arbitrarily, which leads to great variations in the estimates by different authorities of the area occupied by each type. As the following graph shows, there is considerable overlap of these biomes.

Overlap of Grasslands and Woodlands/Forests
Of course, all of this information on biomes is purely for reference. After all, we’re creating our own world, so while the distribution of Earth’s biomes is useful when creating our map, we need not follow it as if it were law. If we are creating our own world (some of you may be world-building on Earth–perhaps an apocalyptic or dystopian version), it will have different wind and weather patterns from Earth as well as landmasses arranged differently. We may have more or less open ocean, not to mention whatever magic or technology that’s at play, which may affect not only how ecosystems arose but how they currently function.
So let’s take our map with our continents and see if we can’t create some biomes.
On the following map the ocean has been removed, and a few additional landmasses have been added, in addition, the poles have also been expanded. So now’s the time to fine tune the look of your continents. Add little islands and that sort of thing. Then we’ll add the mountains. Once the mountains are in, you can add lakes and rivers. Rivers often flow out of mountains from snow and glacier melt-off and then into lakes. From here the water flows out in to the ocean.
Here is a good article on how to get your rivers in the right place. Remember, without the proper technology, cities (especially large ones) will need to be close to a major water source. Also, some sand dunes were added for a few of the major deserts, and as you can see, mine are near mountain ranges. For my world they happen to fall on the leeward side of these mountainous areas (rain shadows) and are near the equator, which makes them subject to the particular global wind circulation patterns of my world. (smaller deserts can be added later with some coloring).

Mountains, Lakes and Rivers added to Map
From here we can begin to add the various biomes and give color to our map. Map 1 shows my world (Zenita) with biomes and color added. Map 2 is Earth’s biomes as a reference for Map 3, my world, shown with Zenita’s distribution of biomes.


I would create a separate layer for each biome category (forests, grasslands, deserts) or at least a separate layer for your biomes. You may even want to create a separate layer for each individual biome.
Note that grasslands are simply colored and not drawn on my map. Trying to draw grass is difficult and it often doesn’t look right, although I did it in my CC3 map, so you’re welcome to try. On my map (Map 1) you’ll see a purple area. Those are the Vendrian Plains (obviously the grass here is purple). The deep-red shaded area is the Red Plains of Hordon. Grass (red) dragons prowl here. Next to the Red Plains is the Vendrilika Forest. The Great Kuloomas have orange leaves so that’s why the forest is orange colored.
You can color your grasslands or forests any color you want. It’s your world after all.
C. Create/Define Your Countries/Nations/Empires
Nations are often separated by geography, such as mountain ranges or large lakes. For instance, a mountain range may be full of mines that are rich in precious metals or gemstones. In such a case, two empires might share these mountains, with each nation staking equal claim to them (the southern part of a mountain range may fall within one empire and the northern part in the other). The same might be true for a lake used as drinking water. However, empire lines may be also be arbitrary. Its up to you.
Start by creating a new layer (arrow 1) and calling it something like Empire Lines (arrow 2).

Select the Brush Tool and chose a pixel size a fair amount wider than the border of your landmass. Now chose any color you want the empire lines to be and draw your first empire line. Afterwards chose a different color then draw the next empire line. Continue this process until all of your empires are defined. Here is an example of three empire borders (red, yellow, blue).

Now let’s make the borders look nice. Select the Empire Lines layer, right click, and chose “Blending Options…” Then under “Blending Options: Custom” move the slider on “Opacity” under “General Blending” to around 50% and then the “Opacity” under “Advanced Blending” to 50% as well. This will give the borders more of a glowing see-through look.

D. Create Your Cities/Towns/Villages, Etc.
When creating your cities you can either draw the images yourself (if you have the skill) or you can import images in from various clip arts, pngs, bmps, jpegs, or whatever. Just make sure they are not copyrighted. Remember to put major cities near a source of water. Small towns and villages may get their water from underground wells instead of a river or lake. Here I’ve added a few cities to the map.

E. Add Roads Between Cities and Important Places of Travel
In order to get nice dashed lines to make our roads in Photoshop we need to do a few steps first.
1. Start by picking a Square brush shape (preset manager >brushes>square brushes). Reduce the Roundness to get the horizontal dash and also increase the Spacing to see the spacing between dashes.

2. You’ll notice in the preview area that the dashes are not oriented along the direction of the curve. This can be fixed by going into the Shape Dynamics section. Change the Angle Jitter’s Control to Direction. Notice how the preview has changed to align the dashes along the curve.

3. Now when you draw something with your newly created brush, you’ll get dashed lines.
Once you’ve got your brush set up the way you like it, chose a brown color and draw in the important roads that connect your cities.

F. Label Your Continents, Biomes, Empires, Cities, Roads, etc.)
Chose names for all the various parts on your map, then create a separate text layer for each individual label. Decide on an appropriate font then label away. To keep things organized you may want to create groups for your layers (one group for continents, one for empires, one for cities, one for biomes, etc. – see map below).

G. Add Navigation Lines (optional), Compass and Scale.
If you want to create navigation lines (portolan chart) I would suggest checking out this guide. If you want to know more about portolan charts go to Wikipedia and read up on it or you can do a search for “navigation lines” on the Cartographer’s Guild to learn all might ever want to know.
For your compass and scale you can either create your own or find one you like online by doing a simple search.
H. Fine Tune, Fix Various Problems, and Continuing to Add/Build.
From here on you can continue to add things as your world grows. Play with your map and fine tune it as your cartography skills improve. You may even add a parchment around your map to lend to its authenticity. Hope this guide helps and you may you enjoy the process of map-making and bringing your world to life.
Back To How To World Build – A Guide


Holy guacamole! What an awesome article. I didn’t realize you put so much work into those maps! Great job!
1Holy Moly, Batman. Look at all the work involved in your writing project, and the visuals you give us are outstanding. If National Geographics sees this you will have an immediate job offer. Are you ready to be “raptured” away.
Dave
2Thanks Dave, but there are those whose worlds and maps are far more developed than mine. Plus I can’t take full credit for this particular map. While I created the world map a few years ago with a program called Campaign Cartographer 3 (CC3) [Map Here], most of the Photoshop map was drawn from the CC3 map by Robert Altbauer. However, I’ve learned a lot about Photoshop and map-making since and I’ve continued to add to the map myself, hence the guide.
3Compared to Chris’s world, explaining 25,000 years of multi-cultural vampire folklore in fully plausible, scientific and rational terms is as easy as counting from one to ten… 😉
I sit in my computer chair, astounded by the complexity of Zenita 🙂
Outstanding world-crafting, Chris!
4Ah Daven, you’re so flattering. I look forward to seeing such world-building in your future installments. The world of the “Pures” seems both highly fascinating and thoroughly developed (at least in your head). I expect to see a fully realized map of your world too. 😉
5Chris,
6Great advice. I’m just about to start this step myself. I’ve even purchased Photoshop. When I first started my book, I had to create a map to make sure I got all the directions right, remembered all the towns, rivers and most importantly in my book, a mountain barrier. It never got farther than a hand sketch, but I wanted to do a nice one for my website.
Thanks!
Having read your story, Beckie, I really don’t think you need a map. Your story worked fine without it. But, of course, you would want to keep track of things for yourself.
7Beckie, while you probably don’t need a map, it can be a lot of fun making one, and you may learn an awful lot about your story and your world-building in the process. And while some people may never look at your map, there will be those who not only appreciate it but who also are pulled further into your world. Best of luck in creating your map. Hope the advice helps.
8To be honest with you, I like Chris’s website, with the whole of his world laid out. I want not only to add a map, but folklore, character histories and all sorts of things. Since I also make jewelry, I was going to add a line of character based silver pieces. In my spare time, of course.
9Thanks. Your idea for your website sounds cool. Let me know when you get your site up and running. Can I put in a few orders for some jewelry I’d like to see created for my world? 🙂 That would be awesome.
10Chris- your pre-storytelling equals the tales you weave.
11Thanks for the compliments, Kevin.
12Um… I balance numbers all day long, and I can reconcile multiple accounts down to the penny, but your attention to detail floors me every time.
Combined with the fabulous creativity brewing on the other half of your brain, it’s no wonder you draft such an amazing story!
13Your college professors undoubtedly heard angels singing when they graded your assignments.
14Haha…as long as I didn’t hand write it. I have the penmanship of a four year old (though some have said a serial killer). 🙂
15Even a four-year-old serial killer has better penmanship than doctors… 😆
16World-building. Isn’t that something we tried in Iraq a few years ago? 🙂
All kidding aside, it looks great, Chris. Way better than I could have done. I like how you’re using natural laws/patterns in geology and climatology to make your world logically sound (or at least relatable to us here on Earth).
You’re quite the methodical cartographer. River placement; wind and climate patterns based on latitudinal bands and zones; and layering physical and political features in such a clear, balanced way makes your maps full of win. Impressive!
Have you considered internal geological systems and their possible ramifications on surface land formations? For example, terrestrial mountain ranges and massive canyons/valleys are the results of subduction and divergent tectonic activities respectively. Whereas Martian formations are largely results of volcanism and impact craters. Both are consequences of each planet’s internal geological composition and systems. Both have enormous influence on their respective topographies. Just as your biomes are based on physical processes, so should your topology. Perhaps you have thought of this already. If not… food for thought.
With that in mind, I find Zenita’s enormous central range most intriguing. There’s a story there. As someone who surrounds himself with geography, I’m dying to know what it is! What was so powerful to leave such a profound and lasting effect on the landscape?
Awesome stuff, Chris. Lastly, I just have to say that I think Taigas suck. I used to like them, until you used one to Fork a Bloodlust on a Craw Giant which was already doubly Giant Growthed. Boo on Taigas.
17Great comments. I am still a novice world builder at best, especially when it comes to geological/geophysical/geographical understanding of how a world is built and shaped from its birth to the time it bears sentient life and beyond. The story of Zenita is one that will constantly grow as I shape the world and come to understand it better myself.
The enormous central region I assume you’re speaking of is the Zenitonian Mountains, which runs through the giant continent of Vadra. There are several stories of how these mountains came to virtually split the world in two, both scientifically and religiously, though I’d love to hear what kind of a story a geography buff like yourself might suggest.
Ah, yes. I have fond memories of Taigas, especially when they are used for dramatic, maleficent destruction. Of course, they often didn’t survive the hand of land destruction for long that you laid down with such indifference and confident ease. I learned to survive however, with a single tree or two. 🙂
18Without cartography, we would all be lost.
19